2024WordPress前端优化之Nginx fastcgi_cache缓存
WordPress优化加速老白博客之前分享过很多了,都是非常小白的教程,包括很多openlitespeed环境和宝塔面板NGINX环境的。今天分享的是基于宝塔面板的“配置 Nginx fastcgi_cache缓存”,适用于WordPress前端优化,后端建议大家使用memcached/redis来优化数据库即可,教程见:https://www.xcbtmw.com/29717.html。

使用memcached或者redis做好数据库缓存及优化后,接下来可以使用 Nginx fastcgi_cache进行前端页面的缓存优化。
WordPress缓存详解:https://www.xcbtmw.com/29813.html
1.宝塔面板安装ngx_cache_purge
宝塔默认已经安装ngx_cache_purge模块,大家可以使用下面的命令行查看,当然也可以用 Nginx -V 来查看的所有编译模块里面有没有这个模块
# nginx -V 2>&1 | grep -o ngx_cache_purge 查看ngx_cache_purge是否安装,没有数据表示未安装
因此只需要通过修改配置文件来启用此模块。选择对应网站,点击设置,修改配置文件!
2.ngx_cache_purge模块配置
2.1 准备工作
2.1.1 设置缓存路径
文件缓存还是内存缓存?
- 在fastcgi_cache_path中,可以将它设置为内存路径,例如:
/dev/shm/nginx-cache levels=1:2 keys_zone=WORDPRESS:100m inactive=60m;,如果你的磁盘IO很慢的话建议采用此方式,毕竟内存的读写速度非常快。 - 当然,你也可以使用文件缓存路径:
/tmp/nginx-cache
选择好了以后,需要在对应的目录(/dev/shm或者/tmp)下创建对应的文件夹nginx-cache
2.1.2 缓存密钥
就是keys_zone=WORDPRESS中的WORDPRESS,你可以设置为自己喜欢的,但注意配置中需保持一致,每一个网站设置一个专用的
2.2 服务器配置Nginx fastcgi_cache
2.2.1 选择设置站点
首先,将以下代码复制到网站配置文件顶部
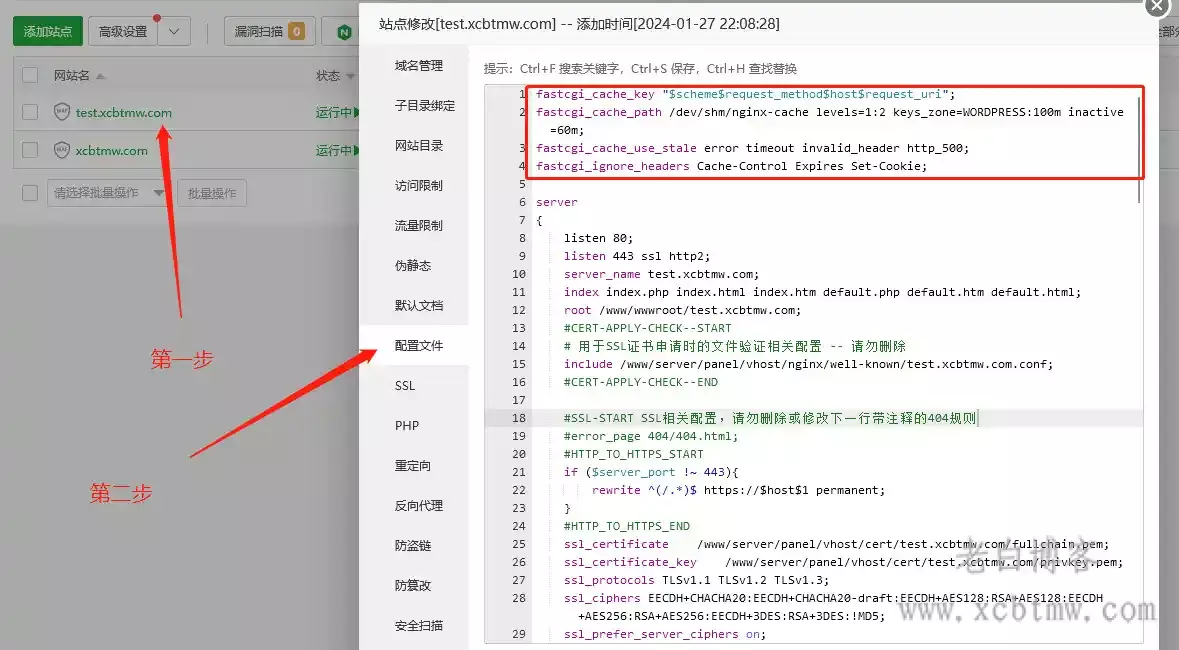
fastcgi_cache_key "$scheme$request_method$host$request_uri";
fastcgi_cache_path /dev/shm/nginx-cache levels=1:2 keys_zone=WORDPRESS:100m inactive=60m;
fastcgi_cache_use_stale error timeout invalid_header http_500;
fastcgi_ignore_headers Cache-Control Expires Set-Cookie;
2.2.2 缓存设置
然后在server字段下添加以下代码,老白建议添加在 #SSL-END下方:
set $skip_cache 0;
        #post访问不缓存
        if ($request_method = POST) {
            set $skip_cache 1;
        }
        #动态查询不缓存
        if ($query_string != "") {
            set $skip_cache 1;
        }
        #后台等特定页面不缓存(其他需求请自行添加即可)
        if ($request_uri ~* "/wp-admin/|/xmlrpc.php|wp-.*.php|/feed/|index.php|sitemap(_index)?.xml") {
            set $skip_cache 1;
        }
        #对登录用户、评论过的用户不展示缓存
      if ($http_cookie ~* "comment_author|wordpress_[a-f0-9]+|wp-postpass|wordpress_no_cache|wordpress_logged_in") {
            set $skip_cache 1;
        }
       #如果需要对所有用户缓存,请将以上代码改为下方的,两段代码只可任选其一
        #if ($http_cookie ~* "comment_author|wordpress_[a-f0-9]+") {
            #set $skip_cache 1;
        #}
        #这里请参考你网站之前的配置,特别是sock的路径,弄错了就502了!
        location ~ [^/].php(/|$)
            {
                try_files $uri =404;
                fastcgi_pass unix:/tmp/php-cgi-82.sock;
                fastcgi_index index.php;
                include fastcgi.conf;
                add_header Strict-Transport-Security "max-age=63072000; includeSubdomains; preload";
                #新增的缓存规则
                fastcgi_cache_bypass $skip_cache;
                fastcgi_no_cache $skip_cache;
                add_header X-Cache "$upstream_cache_status From $host";
                fastcgi_cache WORDPRESS;
                add_header Cache-Control  max-age=86400;
                add_header Nginx-Cache "$upstream_cache_status";
                add_header Last-Modified $date_gmt;
                add_header X-Frame-Options SAMEORIGIN; # 只允许本站用 frame 来嵌套
                add_header X-Content-Type-Options nosniff; # 禁止嗅探文件类型
                add_header X-XSS-Protection "1; mode=block"; # XSS 保护
                etag  on;
                fastcgi_cache_valid 200 12h;
                fastcgi_cache_valid 301 302 3d;
                fastcgi_cache_valid 304 1d;
        }

        #缓存清理配置(可选模块,请细看下文说明)
        location ~ /purge(/.*) {
            allow 127.0.0.1;
            allow (老白)你(博)的(客)服务(提示)器IP;
            deny all;
            fastcgi_cache_purge WORDPRESS "$scheme$request_method$host$1";
        }
2.2.3 配置注意事项
1)add_header Cache-Control如果是动态内容要实时更新的话,可以设置为0,否则可以设置时间大一些,单位是秒。
2)sock的路径一定要填对,否则会出现502错误,关于sock,直接去/tmp/目录下查看对应的文件即可,类似老白博客的php-cgi-82.sock;
3)代码里面的服务器公网IP换成你的服务器公网IP。
4)可选缓存配置:某些主题如果移动端访问报错,可以设置不缓存移动端
    #不缓存移动端访问
    if ($http_user_agent ~* (mobile|nokia|iphone|ipad|android|samsung|htc|blackberry|windowss(ce|phone))) {
            set $skip_cache 1;
    }
5)如果出现评论过的用户依然用的是缓存,那应该是wordpress没有记住cookie,把以下代码加入到functions.php 中即可。
//nginx-cache缓存配置代码-老白博客https://www.xcbtmw.com/29981.html
add_action('set_comment_cookies','coffin_set_cookies',10,3);
function coffin_set_cookies( $comment, $user, $cookies_consent){
   $cookies_consent = true;
   wp_set_comment_cookies($comment, $user, $cookies_consent);
}
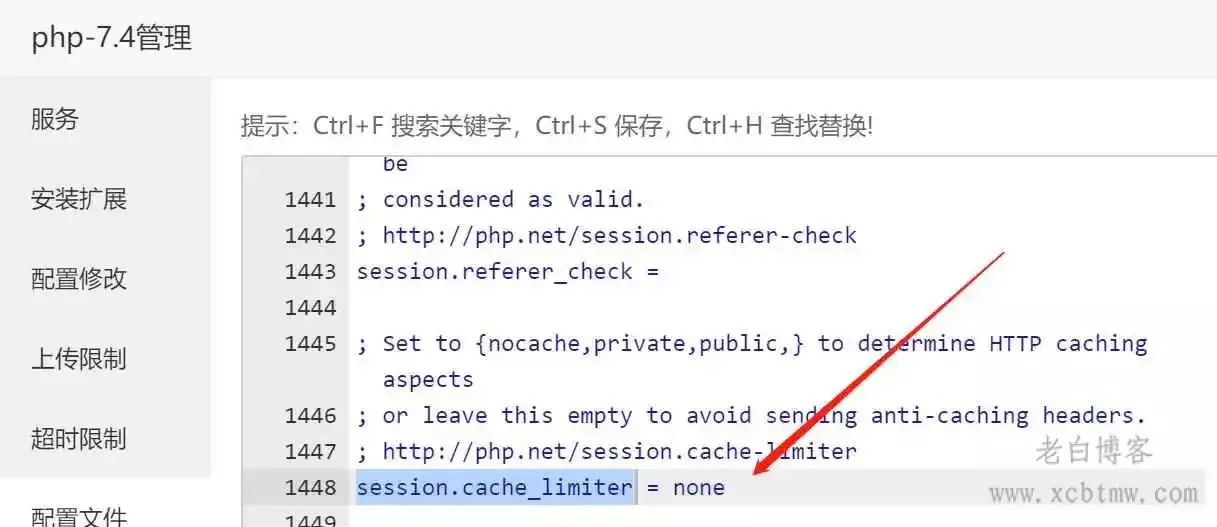
6)启用fastcgi_cache缓存时,发现在Nginx配置文件中添加了Cache-Control信息,但是总是不生效。HTTP头部信息会总会包含以下信息:
Cache-Control: no-store,no-cache,must-revalidate,post-check=0,pre-check=0 和 Pragma: no-cache
修改宝塔面板中php配置文件中的关键词session.cache_limiter,默认值是 nocache ,将它设置为none即可
session.cache_limiter=none
3.WordPress缓存处理配置
3.1 Nginx Helper插件法
进入WordPress 后台插件安装界面搜索 Nginx Helper 关键词在线安装即可
(插件默认是英文的,如果要设置中文看这个:https://www.xcbtmw.com/29439.html)
1)开启purge,选择nginx Fastcgin cahe,因为就我们用就是这个缓存。
2)选择 Delete local server cache files。当然第一个也可以用,但是一般推荐用Delete local server cache files,因为每个服务器的环境都不一样,缓存路径也会不尽相同就会导致插件无法找到缓存文件并删除!
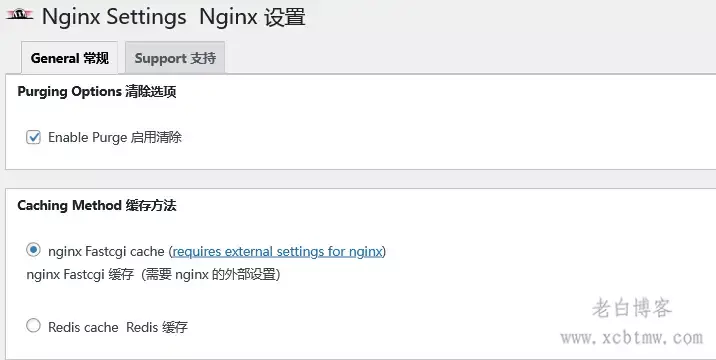
3)插件下面还提供了其它的一些设置,功能非常丰富,例如发表新文章、新评论时是否更新Nginx缓存等,根据自己需要勾选即可。

3.1.1 插件法注意事项
由于插件作者定义的缓存路径是 /var/run/nginx-cache ,而我们可能会根据服务器实际情况来自定义缓存路径,这样一来,缓存路径的不同就会导致插件无法找到缓存文件并删除。
添加以下代码到WordPress根目录的wp-config.php文件中。
 //老白提示-根据实际情况定义缓存的存放路径
define('RT_WP_NGINX_HELPER_CACHE_PATH','/dev/shm/nginx-cache');
3.2 Nginx-helper纯代码版
为张戈大佬原创:https://zhang.ge/5112.html,搬运如下
将整段粘贴到 WordPress 主题函数模板文件 functions.php 当中即可。其他功能细项,在代码和原文中都有详细的注释了,自行参考修改
/**
* WordPress Nginx FastCGI 缓存清理代码(Nginx-Helper 纯代码版) By 张戈博客
* 文章地址:https://zhang.ge/5112.html
* 转载请保留原文出处,谢谢合作!
*/
//初始化配置
$logSwitch  = 0;                  //配置日志开关,1 为开启,0 为关闭
$logFile    = '/tmp/purge.log';   //配置日志路径
$cache_path = '/tmp/wpcache';     //配置缓存路径
//清理所有缓存(仅管理员) 范例:http://www.domain.com/?purge=all
if ($_GET['purge'] == 'all' && is_user_logged_in()) {
    if( current_user_can( 'manage_options' ))
    {
        delDirAndFile($cache_path, 0);
    }
}
//缓存清理选项
add_action('publish_post', 'Clean_By_Publish', 99);                   //文章发布、更新清理缓存
add_action('comment_post', 'Clean_By_Comments',99);                   //评论提交清理缓存(不需要可注释)
add_action('comment_unapproved_to_approved', 'Clean_By_Approved',99); //评论审核清理缓存(不需要可注释)
//文章发布清理缓存函数
function Clean_By_Publish($post_ID){
    $url = get_permalink($post_ID);
    cleanFastCGIcache($url);        //清理当前文章缓存
    cleanFastCGIcache(home_url().'/');  //清理首页缓存(不需要可注释此行)
    //清理文章所在分类缓存(不需要可注释以下 5 行)
    if ( $categories = wp_get_post_categories( $post_ID ) ) {
        foreach ( $categories as $category_id ) {
            cleanFastCGIcache(get_category_link( $category_id ));
        }
    }
    //清理文章相关标签页面缓存(不需要可注释以下 5 行)
    if ( $tags = get_the_tags( $post_ID ) ) {
        foreach ( $tags as $tag ) {
	    cleanFastCGIcache( get_tag_link( $tag->term_id ));
        }
    }
}
// 评论发布清理文章缓存
function Clean_By_Comments($comment_id){
    $comment  = get_comment($comment_id);
    $url      = get_permalink($comment->comment_post_ID);
    cleanFastCGIcache($url);
}
// 评论审核通过清理文章缓存
function Clean_By_Approved($comment)
{
    $url      = get_permalink($comment->comment_post_ID);
    cleanFastCGIcache($url);
}
//日志记录
function purgeLog($msg)
{
    global $logFile, $logSwitch;
    if ($logSwitch == 0 ) return;
    date_default_timezone_set('Asia/Shanghai');
    file_put_contents($logFile, date('[Y-m-d H:i:s]: ') . $msg . PHP_EOL, FILE_APPEND);
    return $msg;
}
// 缓存文件删除函数
function cleanFastCGIcache($url) {
    $url_data  = parse_url($url);
    global $cache_path;
    if(!$url_data) {
        return purgeLog($url.' is a bad url!' );
    }
    $hash        = md5($url_data['scheme'].'GET'.$url_data['host'].$url_data['path']);
    $cache_path  = (substr($cache_path, -1) == '/') ? $cache_path : $cache_path.'/';
    $cached_file = $cache_path . substr($hash, -1) . '/' . substr($hash,-3,2) . '/' . $hash;
    if (!file_exists($cached_file)) {
        return purgeLog($url . " is currently not cached (checked for file: $cached_file)" );
    } else if (unlink($cached_file)) {
        return purgeLog( $url." *** CLeanUP *** (cache file: $cached_file)");
    } else {
        return purgeLog("- - An error occurred deleting the cache file. Check the server logs for a PHP warning." );
    }
}
/**
 * 删除目录及目录下所有文件或删除指定文件
 * 代码出自 ThinkPHP:http://www.thinkphp.cn/code/1470.html
 * @param str $path   待删除目录路径
 * @param int $delDir 是否删除目录,1 或 true 删除目录,0 或 false 则只删除文件保留目录(包含子目录)
 * @return bool 返回删除状态
 */
function delDirAndFile($path, $delDir = FALSE) {
    $handle = opendir($path);
    if ($handle) {
        while (false !== ( $item = readdir($handle) )) {
            if ($item != "." && $item != "..")
                is_dir("$path/$item") ? delDirAndFile("$path/$item", $delDir) : unlink("$path/$item");
        }
        closedir($handle);
        if ($delDir)
            return rmdir($path);
    }else {
        if (file_exists($path)) {
            return unlink($path);
        } else {
            return FALSE;
        }
    }
}
4.效果展示
启用了Nginx fastcgi_cache后,我们就可以在浏览器Header 头部信息中看到已经命中了。
- 刷新页面,当前端页面头部header出现如下图所示的HIT,表示命中,fastcgi_cache缓存加速成功配置。
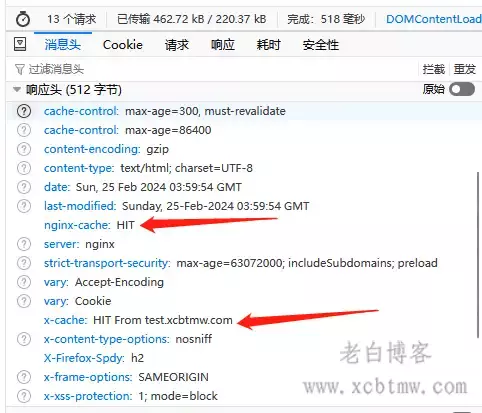
对于已经设置了不缓存的页面,Nginx fastcgi_cache会直接显示BYPASS,我们如果是登录状态那是不显示缓存的
同时,我们设置服务器的缓存路径中也能看到Nginx fastcgi_cache生成的缓存文件。
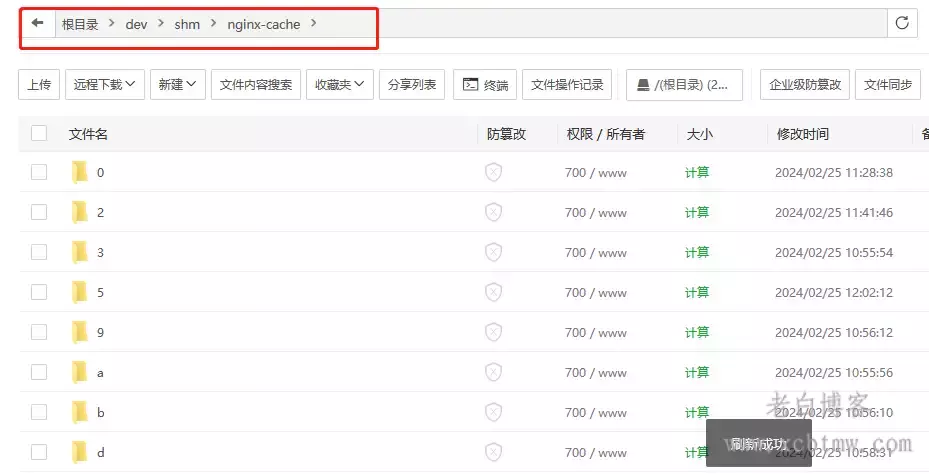
4.1 效果演示站

如果使用纯代码版的插件,那么也可以实现零插件优化WordPress
memcached+batcache后端,fastcgi前端:https://test.xcbtmw.com/
4.2 多站点设置
如果要开启更多站点缓存,按照上面的教程在对应网站添加即可,注意事项如下:
- 每个站点的缓存路径 (fastcgi_cache_path)和缓存密钥( keys_zone )设置为不一样的
- 同一个顶级域名下面的子域名不需要加上面配置中的第一行,注释掉
fastcgi_cache_key "$scheme$request_method$host$request_uri";





这个我应该要搞一下,我觉得我的很慢。。
这个可以使用redis或者memcached进行搭配使用
本文所列的ngx 缓存,在主要参考你这篇文章以后弄好了,且效果显著(我今儿尝试了各种缓存插件,装了还不如不装快)
谢谢~~
不过,memcached没有成功,我马上再试试
mem拓展那些得安装好
如果用张戈的纯代码版,只在主题函数模板文件里添加代码就行了吗?添加代码之前需要安装模块吗?
也需要安装模块,纯代码版本仅仅只是替代了插件的功能而已